By default, WhatsApp notifies users when they receive a message, call, or video call from a contact or group. But what can you do if the notifications aren't working? In this tutorial, we will show you how to fix WhatsApp notifications easily.
Why WhatsApp notifications do not arrive: possible solutions
WhatsApp notifications are essential to keep us aware of our messages and calls. However, on occasion, they may stop working for no apparent reason. Here are a series of checks, tips, and solutions to solve this issue and ensure that WhatsApp notifications work properly again.
Close and reopen WhatsApp
Sometimes, closing and reopening the application can solve this problem. WhatsApp does not allow you to log out, but you can force it to stop. To do so, proceed as follows:
- Open the settings menu of your smartphone.
- Look for the Applications section or a similar one (the name may vary from one Android device to another).
- Select Manage applications or a similar option.
- Search for the WhatsApp app in the list.
- Tap on Force stop.
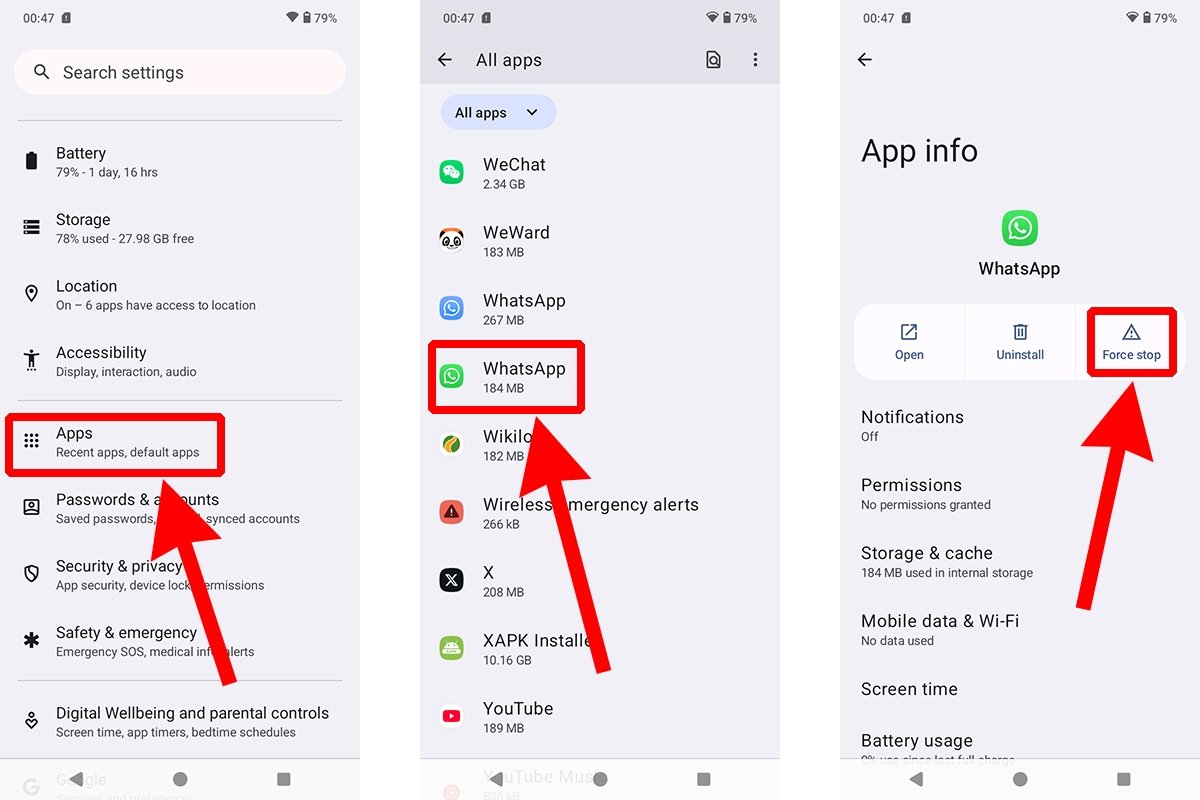 Steps to force WhatsApp to stop
Then, open WhatsApp again and check if the notifications are working.
Restart your smartphone
Time for a classic fix: rebooting the device to see if this fixes minor system issues that affect notifications. To do this, follow these steps:
- Tap and hold the power button on your smartphone.
- Select Reset (or Turn off and then turn it back on).
- Enter your PIN and use your smartphone normally.
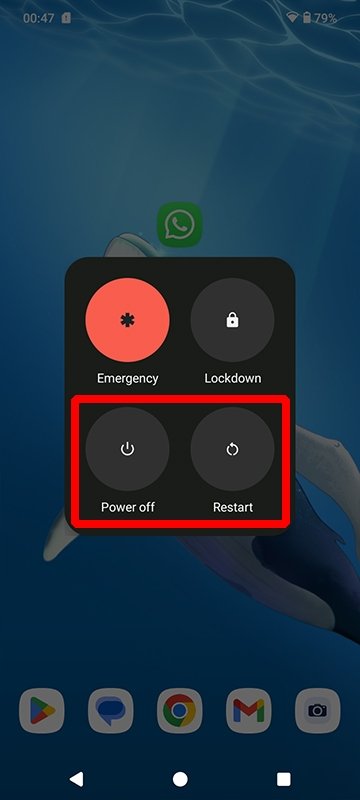 Options to reboot an Android phone
Once the device has been rebooted, check if WhatsApp notifications are working properly.
Check that the app is up to date
Older versions of WhatsApp may be buggy. To prevent this, you must keep the application up-to-date. You have three options:
- Check if Malavida has a new version of the app.
- Do the same on Google Play.
- Enable automatic updates from the app by following this route: Settings > App Updates > Update WhatsApp automatically.
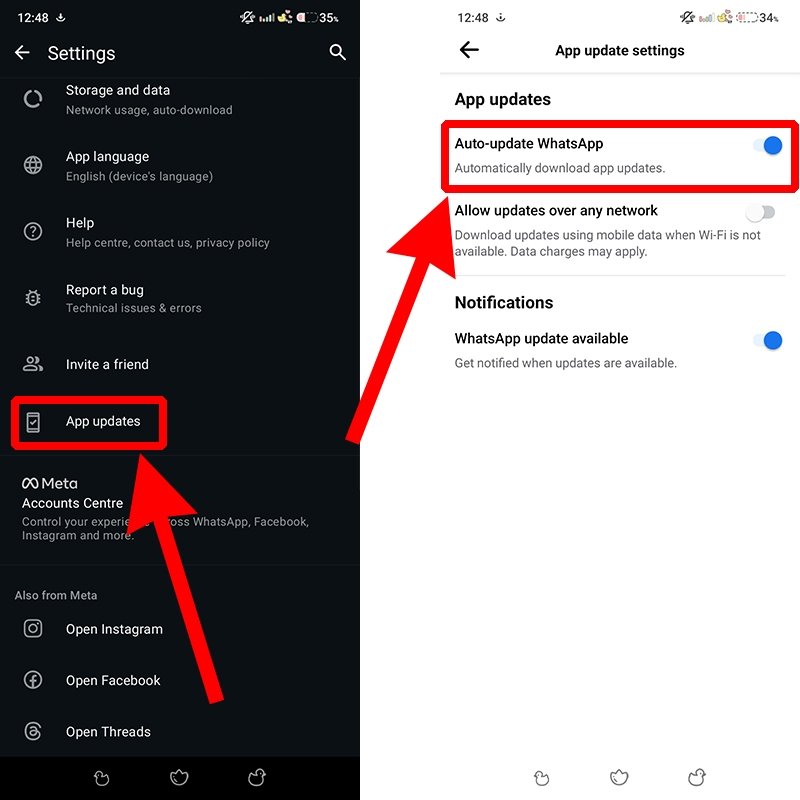 How to know if WhatsApp is up to date
Additionally, you can enable updates over any network or restrict them to wifi only.
Check that you have an Internet connection
Without a stable internet connection, notifications won't arrive. You can check if the wifi connection or your mobile data is active from the Android notifications drop-down menu.
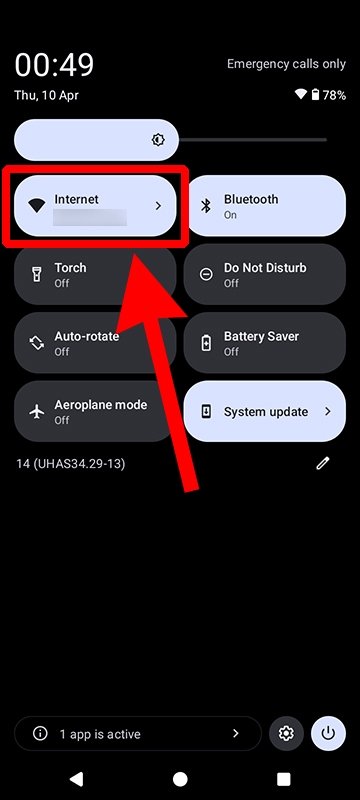 How to check if an Android phone is connected to the Internet
If at least one of the two checkboxes is active and you have an internet connection, try opening a website to confirm your connection is stable.
Clear WhatsApp cache
Temporary files may interfere with the app's performance. To clear the cache, follow these steps:
- Go to the settings menu of your smartphone.
- Look for the Applications section.
- Tap on Manage applications.
- Find WhatsApp in the list.
- Look for the Storage and cache or Clear data option.
- Select Delete cache or Clear cache.
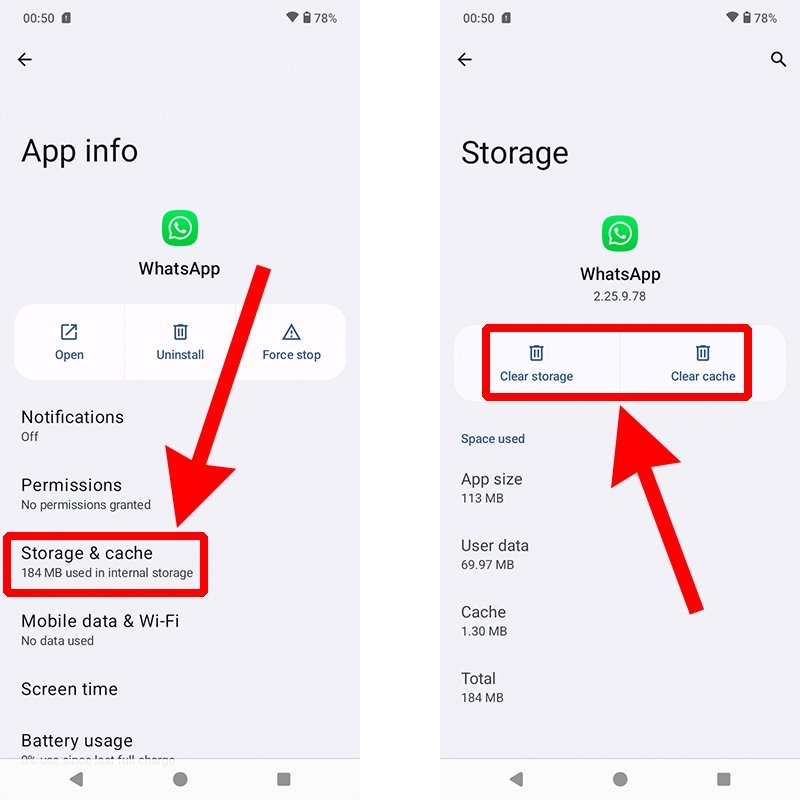 How to clear WhatsApp's data and cache
You also have the option to clear the app storage directly.
Check WhatsApp permissions
WhatsApp needs certain permissions to function properly. Generally, it requests them when you start the app, but you can modify the permissions at any time in the following path:
- Go to Settings on your Android smartphone and follow this route: Applications > Manage apps > WhatsApp.
- Select Application permissions or a similar option.
- Make sure that all necessary permissions are enabled.
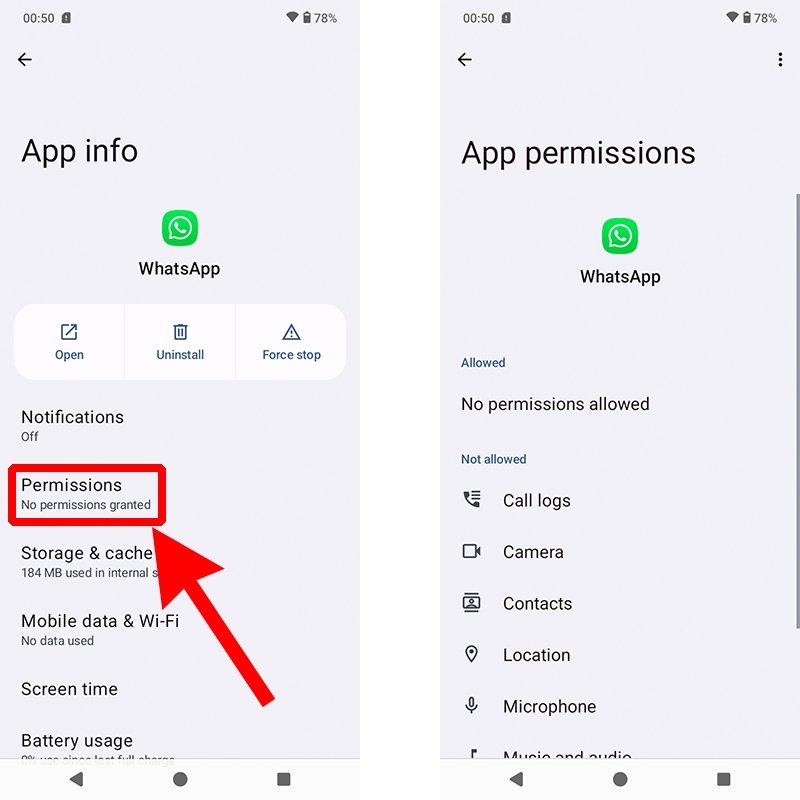 Menu with the user permissions granted to WhatsApp
Besides the required permissions, WhatsApp has “other permissions” that we can give or refuse.
Verify that the Do Not Disturb mode is not active
The smartphone's Do Not Disturb mode silences notifications. But how do you know if it is enabled?
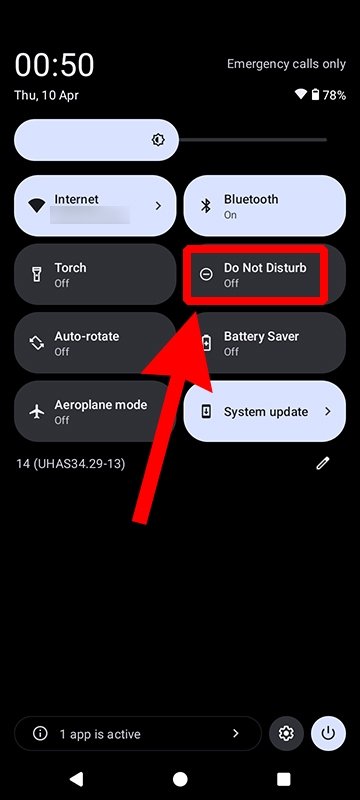 How to see if the Do Not Disturb mode is enabled in Android
It is as easy as swiping the notification bar and looking for the corresponding button. Depending on your smartphone, this feature might be called Distraction-free or Sleep mode.
Verify your smartphone has the Silent mode disabled
I'm sure you have already checked, but maybe WhatsApp notifications are not working because your smartphone is in Silent mode.
 How to find out if your Android phone is muted
To check if the Silent mode is active, use the lateral buttons to increase the volume. If you hear a sound, that means the audio is enabled on your smartphone.
Check that you have not activated Airplane mode
Airplane mode disables all connections; in other words, you cannot receive notifications from any app.
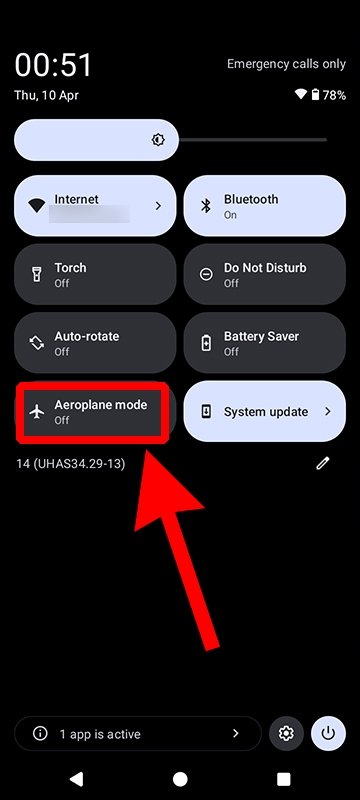 How to know if flight mode is enabled on your Android phone
To check if the airplane mode is active, swipe the notification bar. The option you are looking for has an airplane icon.
Verify WhatsApp notification settings
Notifications may be disabled within the app. You can check it in the following way:
- Open the WhatsApp app on your smartphone.
- Tap on the three dots icon.
- Tap on Settings.
- Select Notifications.
- Check that notifications are enabled and they have a ringtone assigned to them.
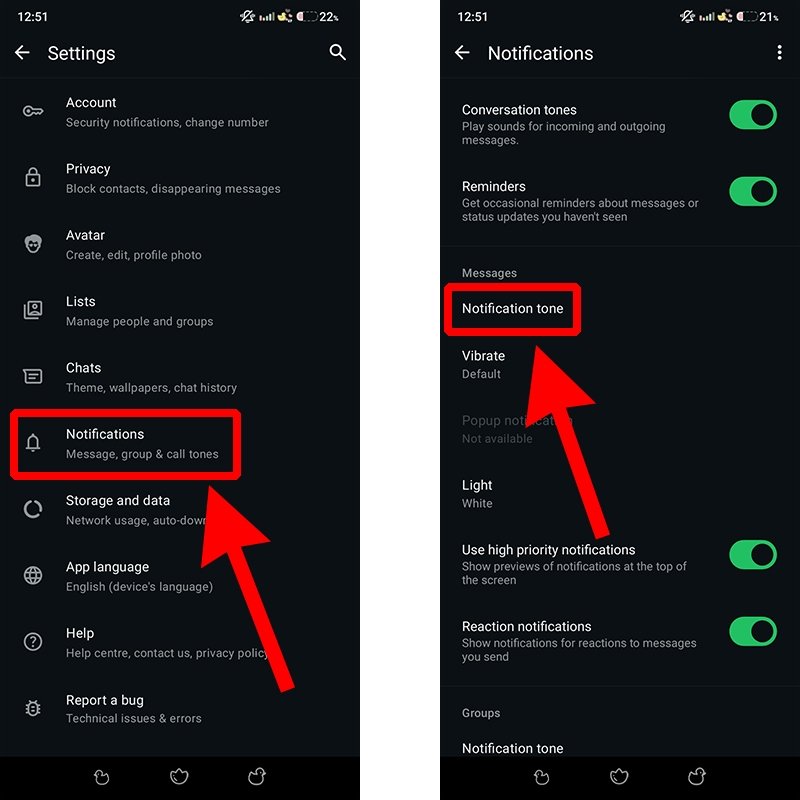 WhatsApp's notifications menu
From here, you can activate and deactivate the conversation ringtones and reminders, as well as the vibration and light alerts. Settings can be made for groups, individual chats, and voice and video calls.
Check if you have archived or muted chats
Archived or muted chats do not create notifications. But how do you get to the archived chats?
- On the main WhatsApp screen, scroll down to the archived chats section.
- If there are important chats archived that you want to receive notifications from, select them by holding down your finger for a few moments.
- Tap the arrow icon in the box to unarchive the chat.
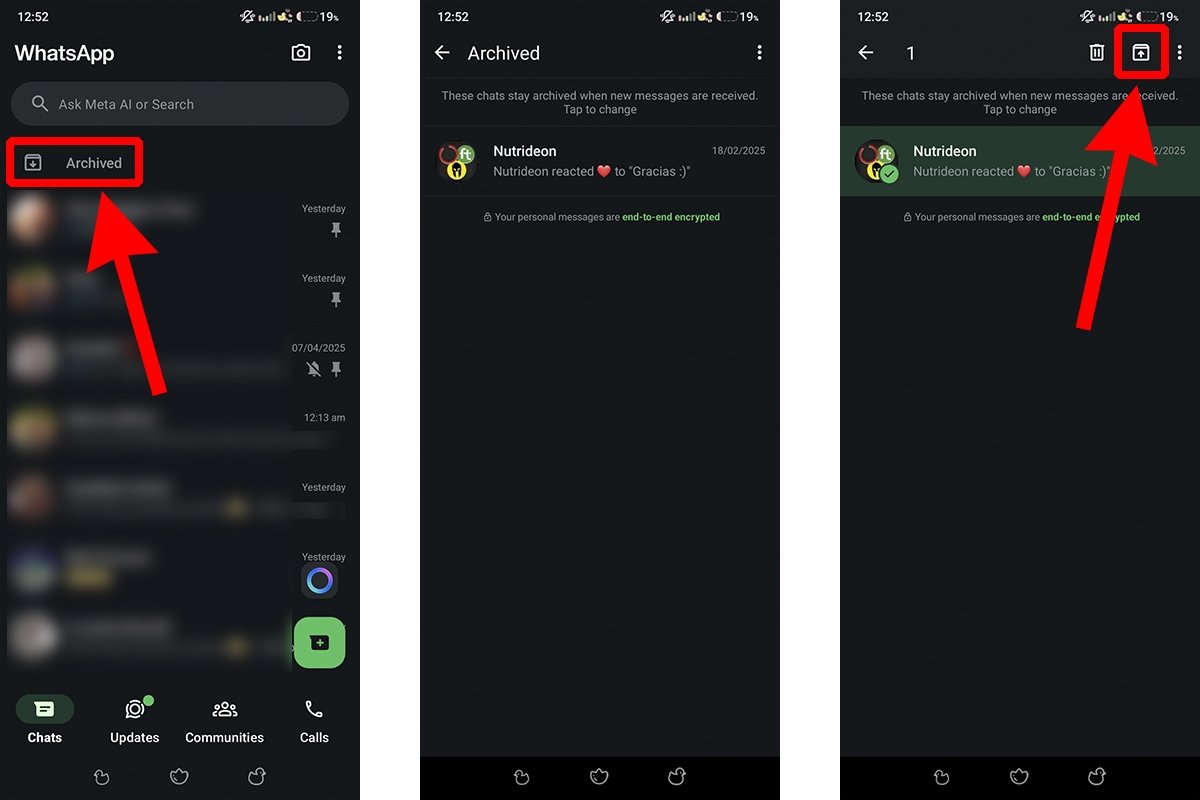 List of archived WhatsApp conversations
As for muted chats and groups, you will have to search for them and unmute notifications from the settings menu within the chat.
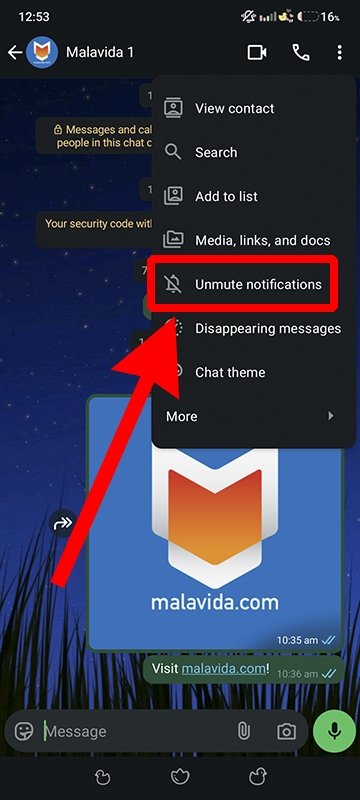 How to unmute WhatsApp chats
This option appears when you tap the three dots icon in the upper right corner.
Change the ringtone of WhatsApp notifications
A notification ringtone that is too discreet or too low in volume may cause notifications not to be heard. Fortunately, you can easily change it like this:
- Open WhatsApp.
- Go to the Settings menu.
- Select Notifications.
- Tap on the Notifications tone option.
- Choose an app and the tone you want.
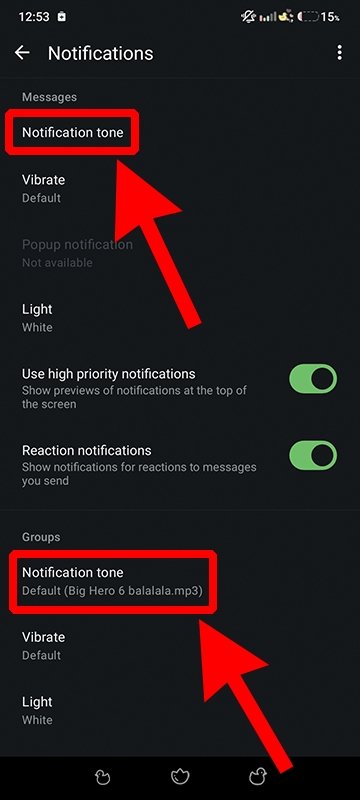 Steps to change WhatsApp's notification tones
You can change the notification tone for private and group chats, as well as for calls.
Uninstall and reinstall WhatsApp
If the above solutions do not work, reinstalling the app may help. To do so, proceed as follows:
- Open the Settings menu and follow this path: Applications > Manage applications > WhatsApp.
- Tap Uninstall.
- Confirm the action in the floating menu.
- Download the APK file of the newest version of WhatsApp from Malavida by tapping the green button.
- Enable the option to install applications from unknown sources if you have not already done so.
- Finish installing the app by following the on-screen prompts.
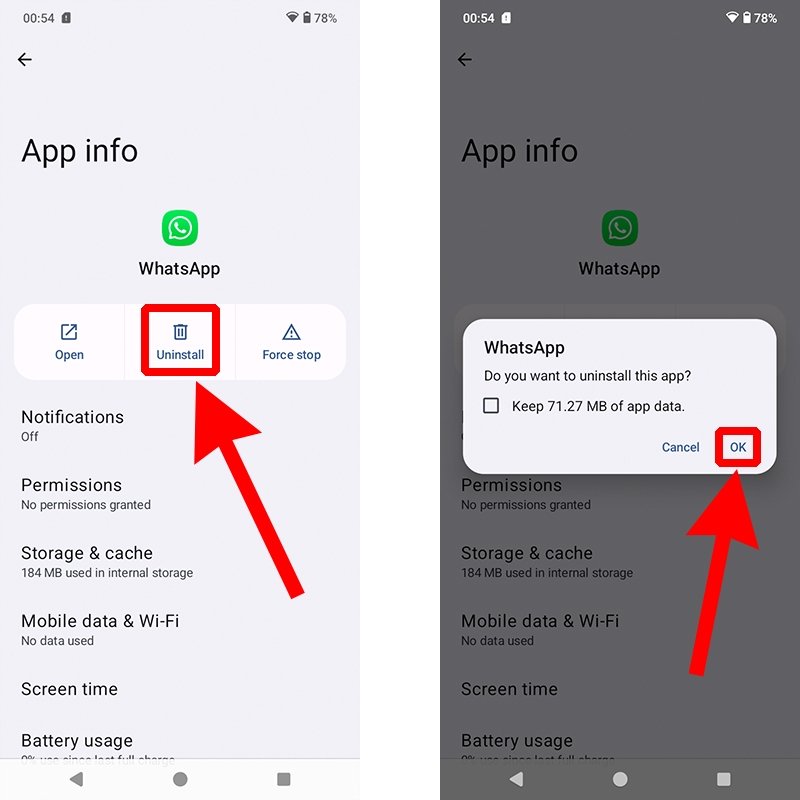 How to uninstall WhatsApp on Android
Remember that Malavida is a safe source for downloading APK and XAPK files.
Disable battery optimization for WhatsApp
Some Android devices restrict background apps to save battery life, which can affect notifications.
- Go to Settings > Applications > Manage applications > WhatsApp.
- Tap on Battery usage.
- Select Optimized or Unrestricted.
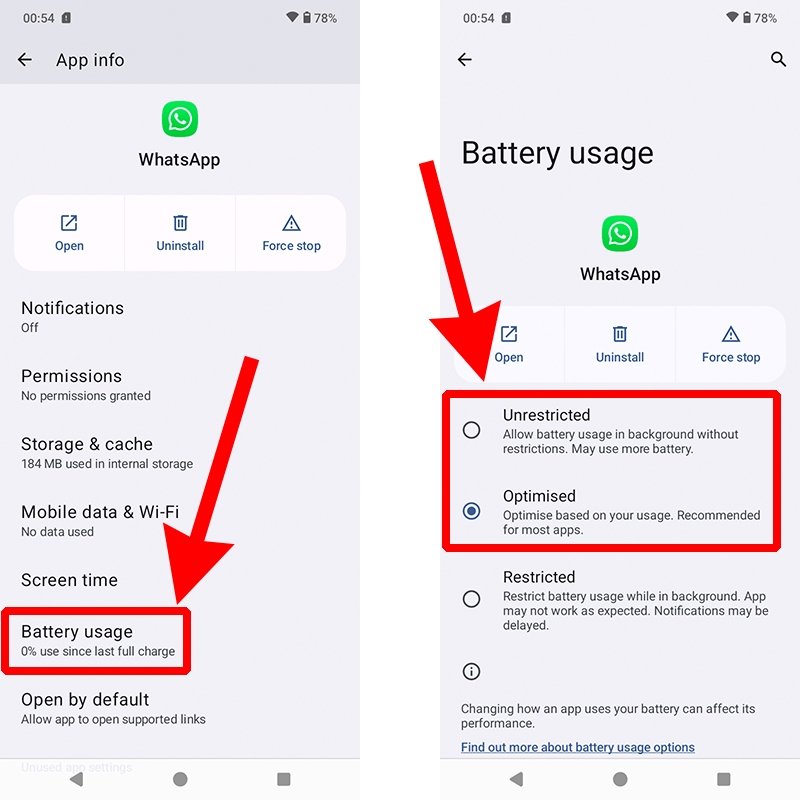 How to disable battery optimization for WhatsApp on an Android phone
Your Android may have other options in the menu, such as Restrict background activity.
Check if you have enabled the data saving function
Data Saver mode can limit the connection of apps when they are not in the foreground. If your smartphone has this option, it will be in a path similar to this: Settings > Networks and Internet > Data Saver.
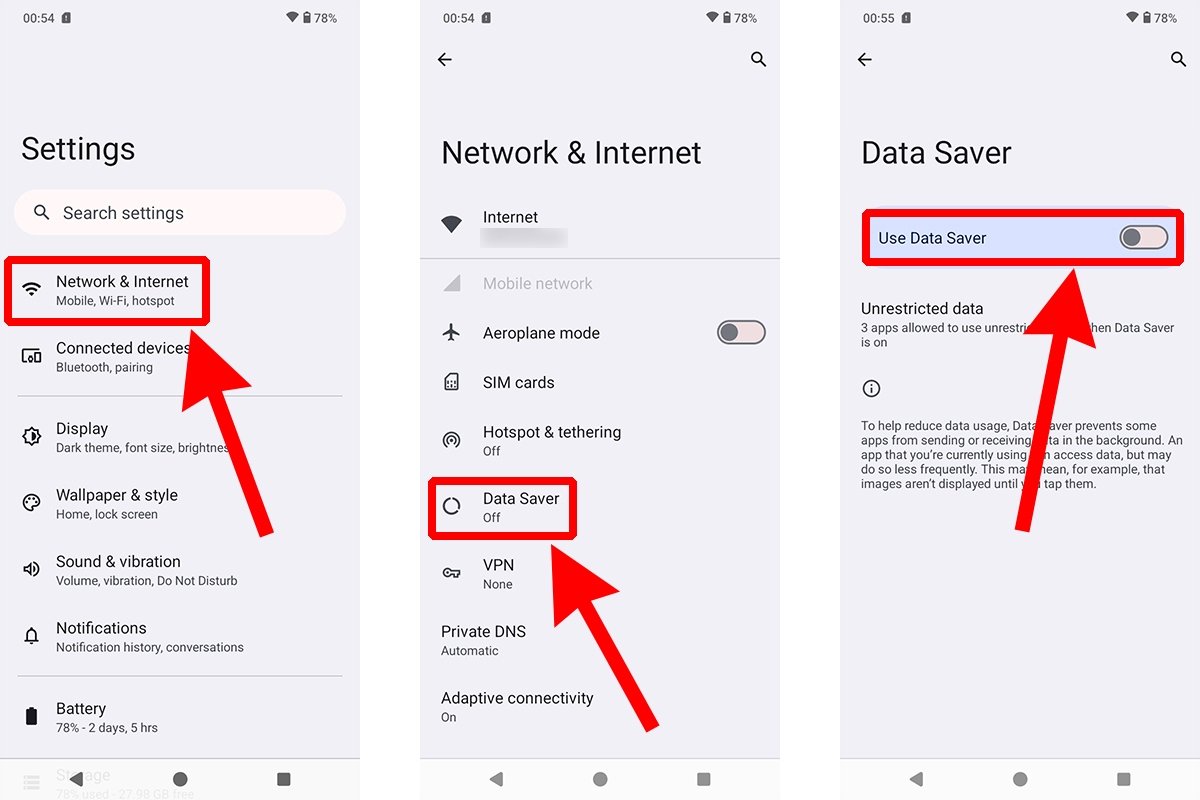 Where to find Android's battery saving function
Next, you must deactivate the data saving option (if it was active).
Verify system sound settings
You may have turned off the notification volume without realizing it. To check it, go to: Settings > Sound & Vibration.
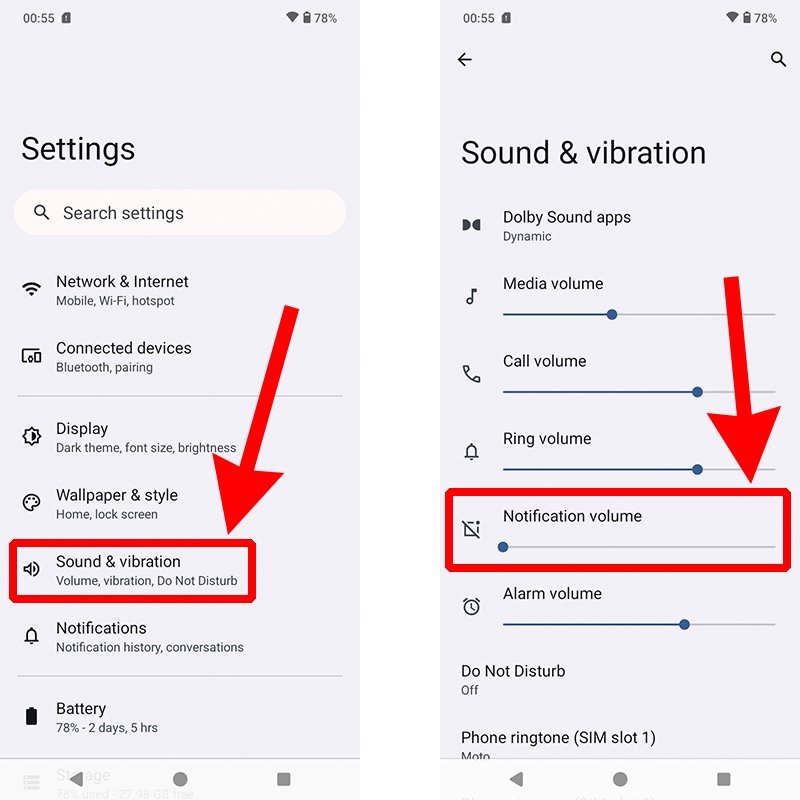 Settings of Android's sound and vibration menu
Make sure that the notification volume is not turned off. You can also check that you have not activated the Focus mode or custom sound profiles without audio.
Check floating notifications or bubbles
If you use floating or bubble notifications, make sure they are enabled for WhatsApp. To do so, follow these steps:
- Go to Android Settings > Apps > Manage apps > WhatsApp.
- Look for the Notifications section.
- Tap on Floating Notifications to enable them if they were disabled.
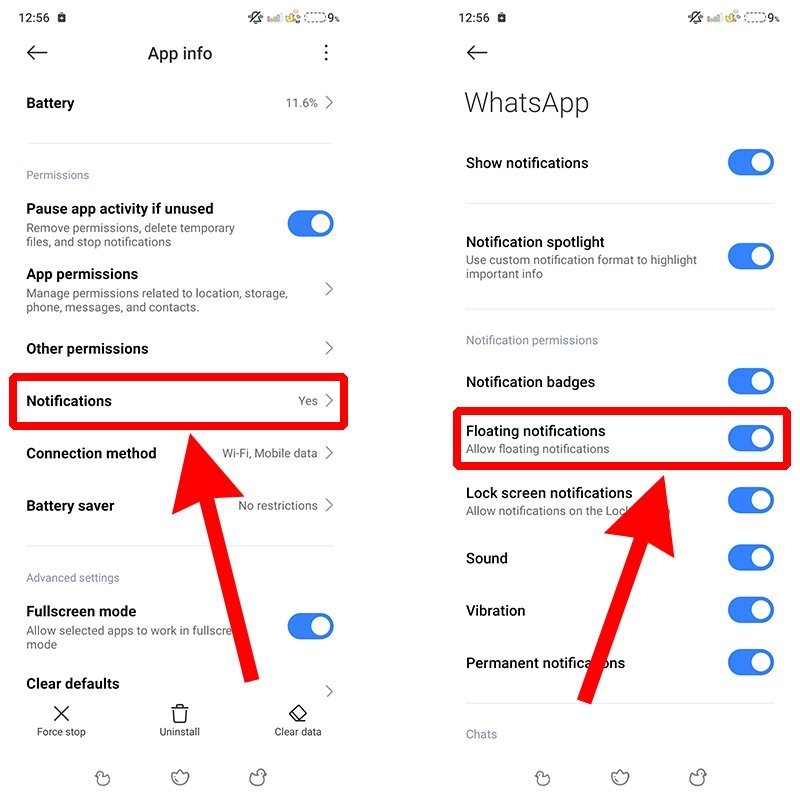 How to check WhatsApp's floating or bubble notifications
From this menu, you can manage every little detail of your notifications.
Reset the device
As a last resort, you can reset your smartphone to factory settings to see if this solves persistent problems. This option is in the Android Settings menu but may appear in different sections depending on the model. For example, Settings > About phone > Factory reset.
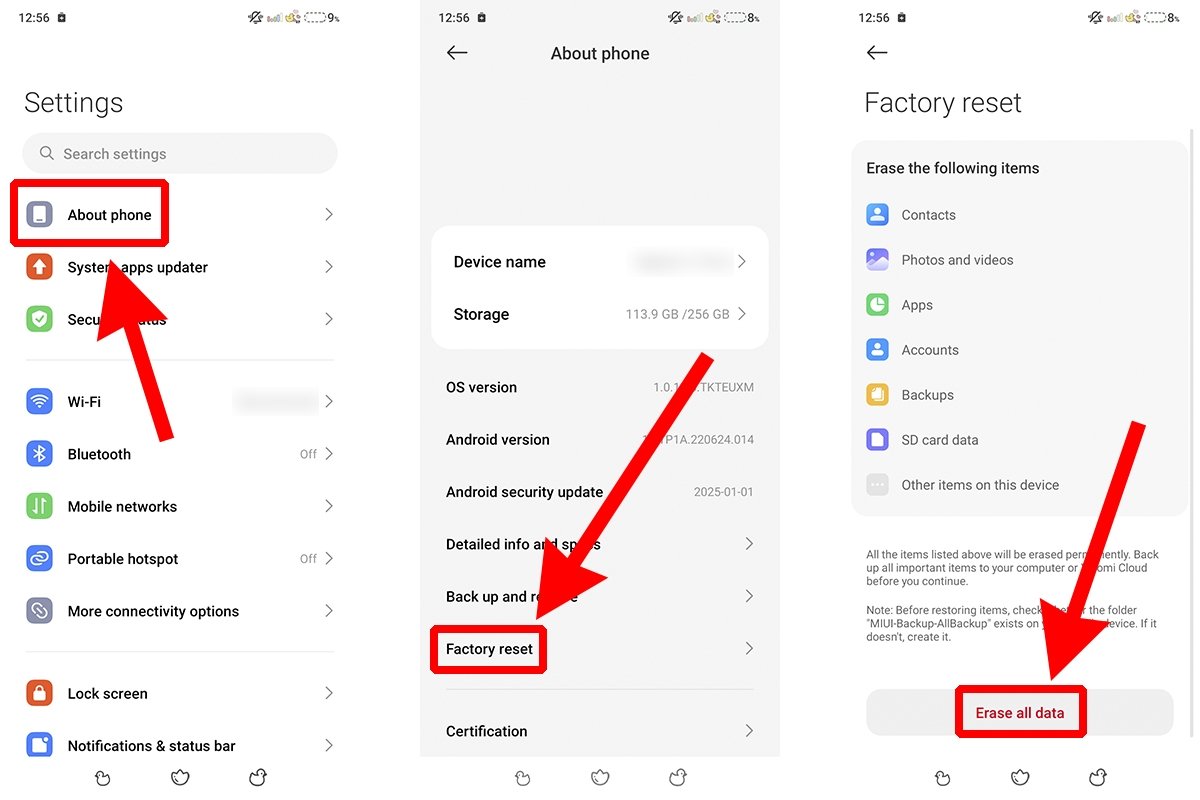 How to restore an Android phone to factory settings
Remember that, if you reset your device, everything will be erased: applications, contacts, photos and videos, documents, accounts, and more. Make sure you make a backup before proceeding, and continue only if you know what you are doing.

